Wednesday, December 30, 2009

Stars in my eye ...

Mid-December saw me quickly getting packed and onto a train to be with family while they attended to a family matter. So, whatever plans I had for getting some quilting done went with me on the train.

This top was put together very quickly .... as in 2 days ..... I was just getting ready to make the backing and sandwiching this top so that it would be ready for machine quilting when I got the phone call. Instead, this top was given as a Xmas present as is. :o) The idea for this top came from here. Mine looks different, but this lady sure spurred me on.

I'm back home now, suffering with a cold virus. Yuck ...

Since coming home, the girls have been my shadow and all they want to do is have their treats and play and then snooze. Lately, their favourite toy is just a simple string that is pulled underneath a piece of fabric . Both of them go nuts over this.

The only project that I had time to grab and take with me were my hexagon stars. I'm on a roll with them and have continued to keep sewing the stars together since coming home. This is my set-up for keeping the stars in order as they are sewn together. A section is removed from the design wall and pinned onto a piece of styrofoam board and then I continue to work in rows. Right now, I just don't feel like working on anything else and just need some mindless sewing. Next week will be better once this cold virus gets out of my system.

So, until then .... Happy New Year to one and all!

Tuesday, December 22, 2009

Season of Giving

Do you remember this quilt that I made and sent over to Italy for the 'Thousand Colours' earthquake project? Well, this holiday season the quilts are being handed out to the children living in the towns that were devastated during the earthquake. Go here to read all about the presentation ceremonies and scroll down to read more about the project. This is the season of giving and what a perfect time to give to these children.

Wishing all of you Happy Holidays. Stay safe! :o)

Friday, December 11, 2009

Challenge updates

I have to put aside these challenges and work on some stuff that needs to get done. Amongst all this, our main bathroom is being painted. Talk about putting extra pressure on myself! So, between scrubbing my hands of paint and sewing, I'm a busy girl.

This is my layout that will be done for the red/white snowball challenge. I have all the centre blocks done and just need to start sewing the white blocks on the outside. I changed the block size to 9" and by the time this is finished, it will be queen size. A number of quilters in the challenge are starting to layout their blocks and there are some different layouts being done. Sure am looking forward to seeing what everyone ends up doing.
For my Joseph's Coat, this is as far as it will get for now. I'm looking forward to the instructions for putting these blocks together. The pink you see is just the styrofoam board that is part of my design wall. I sure am loving the colours and the way they flow.
With all the leftover fabrics, I foresee a number of quilts with these colours.:o)
Have a great day and happy sewing!

Sunday, December 6, 2009

Sky Jewels

.... and that is the name of this pattern. Usually, when I see a pattern that I like and want to make, the pattern gets changed during the making. But, not this one. The first time I saw it, it was love at first sight and the design is exactly as per the pattern. The only thing that was added are the beads on the stars as I was hand quilting. It is a slow process doing it that way, but it sure gives this quilt a lot of sparkle. A lot of beads were used here and my stash has been somewhat reduced.
This whole quilt has been hand pieced (that is where the pattern directions got changed), but if I was to do it all over again, English Paper Piecing is the way that I would go.
Enjoy and have a great day!
Pattern source: Quilt It for Christmas 2006 magazine (designer Gail Cole of Odessa, Texas)

Tuesday, December 1, 2009

We're determined .....

I'm determined to get this UFO done by New Year's Eve. This quilt has been pledged to be finished by then. It has been hanging around long enough. There is still some more machine quilting to do and lots of applique in the borders to be applied.

You have no idea the number of times that I have put down different layouts for applique. None of them appealed to me. I'm still not sure about this one, but it is growing on me the more I look at it.

The applique is being done after the quilting. This is not usual practise, but that is what I'm doing. Again, it is because I just could not decide on the layout. Did I mention that I am determined .....

.... and Hank is determined to sleep on my quilt while it is being machine quilted .... .... and while applique is being done ...
Yes, we are both determined! :o)
Have a great day!

Friday, November 27, 2009

Oh, those challenges

I have been a busy lady working on my challenges that I signed up for.
This is my red/white challenge.....
..... and this is my Joseph's Coat.
For both these projects, a few more FQ's had to be bought to help even out the scrappy look. Otherwise, it feels so good to be dipping into my stash to make all those blocks.
Have a great day!

Tuesday, November 24, 2009

Diamond Stars

Once I finished my hexagon top, my fingers needed another English Paper Piecing project to work on. This new project was started this spring but I never got around to showing it to you.

So far, this is half of the diamonds made (it will be queen size). The hexagon fillers are made out of two different fabrics to give it an added surprise. Actually, I didn't have enough of either fabric to use, so decided to use both and I have to say that the look is rather interesting.

I was having a little bit of problem with my star points meeting in the centres, so added the little hexagon to hide them and I much prefer the look.

I want to do something different with the borders, but don't know what yet. Probably applique....

Have a great day!

Friday, November 20, 2009

Happy .... eeerk .....happy again

Back on my post of Sept. 24, I showed this UFO that is part of Finn’s challenge. This hanging has been on my design wall for quite some time now (as in many months ...) and I just didn’t know what to do with it. Now, I could have done any appliqué design and it would be fine … but what appliqué design? Lordy me, but I was stumped.

I showed it to Debra, she knew exactly what should be done …. it was staring me in the face all this time. She said (Oh, wise woman) to replicate the fussy cut flower in the 9-patch. Oh, my …. what an idiot I am ….
And that is exactly what I did. I copied the flower and blew up it gazillion of times to reach the desired size. Then, using CLOVER water soluble marker and my light box, the design got drawn onto the large white area of my top.

Merrily, I went doing my appliqué and making some more adjustments to the placement … until finally it was done. How happy I was! Note the ‘was’ word here.
The top was finally ready for sandwiching, but first I drew my quilting lines using Crayola washable markers. I was not happy with the quilting lines, so a quick wash and dry and start all over again was in order. This is where I became a very unhappy woman.
The blue CLOVER marking lines (that should have easily come off) turned from blue to yellow and they would not go away. I tried just about everything. A quick email to CLOVER for help was ignored. It is their product and they should care about problems like this. The Crayola washable marking lines went away just fine …. but not CLOVER.

Finally, I pulled OXY GEN out and using full strength, let my top soak overnight in their solution.

Eureka! It worked like a charm. Those ugly yellow lines are gone, gone, gone! I thought for sure that this top was a candidate for the garbage bin, but not now! :o)

Now, I will re-mark my quilting lines using Crayola and then I can finally get this UFO quilted and done.

Have a great day!
P.S. The same Clover pen was used on my Joseph’s Coat and those lines disappeared just fine. Why? Is it the material that is causing this problem? For my Joseph’s Coat, I used Moda muslin and for this top, I used Kona cotton. Both cottons were pre-washed and dried removing any chemicals. It is indeed, a mystery.

Monday, November 16, 2009

Joseph's Coat

Along with many others, I have signed up to make the quilt over on Don’t Look Now blog. These are my colours that I’m going with. The plan is to make 1-1/2 blocks per week. So far, I’m behind a bit but I have enough petals prepped for 6 more blocks so all I need to do is cut out some more background fabric and just sew, sew, sew.

Have a great day!

Friday, November 13, 2009

Basket case

Last week, when I was at Debra’s for lunch and a sew-in, what did my eyes spot, but this beautiful expanding sewing basket (the one with the legs and handle).Many years ago, my parents had given one to me, but it was too small to hardly hold anything and it fell apart (all the moving parts that I should have looked after, went missing) and I gave it away. Oh my, how foolish of me …..

This past year, I have been looking for another one, but larger this time. I’ve been browsing the thrift stores but no luck.

So, here at Debra’s is THE basket that I have been lusting for and she wasn’t using it except as a table to put our cups of tea on. Debra had bought it from another lady that was getting rid of stuff and I (oh, lucky me) bought it from Debra. Joy, joy, joy!

It is huge and holds so much stuff in it and I have been using it since coming home with me. This basket really helps to keep my sewing area in our living room tidy.

Do you see the other large wicker baskets on the left? I bought those at thrift stores and they hold hand projects that I am currently working on. Again, they help to keep that area neat and tidy.

Now, onto another subject. Last month, Phyllis was looking for a pattern of a quilt that I showed on my blog. I sent her the pattern and in return she made this ATC. Isn’t it beautiful?
I was also able to help Elfriede with my Lover’s Knot pattern. She, in return, sent me a CD with all kinds of needlework stuff on it and a piece of fabric. Thank you, my dear friends for being so kind to me.

That is what I love about blogging ….. we help each other with projects or problems and really the world is just a click away.
Have a great day!

Tuesday, November 10, 2009

1 UFO Done!

Well, here it is .... my siggy or signature block quilt ..... it is done! This is finish #1 for Finn's challenge that I signed up for ..... yeah me! :o) Instead of doing a label for the back of the quilt, here is my label block (I was short one block for the border corners). With this photo, you can see the backing that was used and some of my stipple machine quilting and my hand quilting in the borders.
Thank you, Connie for taking on the responsibility of hosting this block swap .... just look at what came of those blocks!
I wanted to take photos of this quilt down at Scarborough Bluffs where Jennifer and her DH and I went for a walk a few weeks ago. Today, it was too sunny for photos and too breezy. There will be another photo opportunity with another quilt.
Have a great day!
Pattern source: EQ6. Quilt size: 72-1/2" x 94" (top size before quilting 76" x 100").
Edit Nov.13,2009 - there is a slight bleed out with some of the blocks, so when you wash your quilt, use a product that will help absorb any excess dye.
Also, a couple of the signature blocks washed out the writing and some others faded a lot. Advice .... take photos of your blocks and then if any writing washes out, you can re-write the info. on the blocks.

Thursday, November 5, 2009

Fabric holders and cat fight!

When I am thinking about a new project, fabric is pulled from my stash, ironed and placed on various holders in order to keep the fabric pressed and at hand for when I’m ready to start cutting.

Here is a clothes dryer (and it sure is sturdy) that holds the bulk of the fabric.

A quilt rack (purchased at a thrift store for just a few dollars) and rigid Styrofoam boards.

Here is all the red fabric for my red/white challenge quilt.

The girls ….. you thought they were sweet and adorable ….. well …. they are, but a few times a week they fight. I still can’t believe that I caught them in action. Peace and quiet prevailed a few moments later.
Tomorrow afternoon, I will be making my way over to Debra’s place for lunch and a sew-in. She will have lots to show me! :o)

Have a great day!

Monday, November 2, 2009

What's missing?

You know, , I’m really a blue/green type of gal (there are 3 totes of blue and 2 totes of green in my stash) and you can easily see that with these quilts.Then, just to spice things up a bit, here are some of my quilts with every colour under the sun thrown in …
… and then the softer side of me comes through with these quilts.

So, what is missing? Red and white quilts.

You know, I don’t have one single patriotic quilt …. not one!! Jennifer (way over there in Aussie land) made a table runner to help her Canadian friends celebrate Canada Day this year. How embarrassing is that?
After she left our house, it got me thinking …. a lot. I have been looking at red/white quilts for a while now and even did some designs in EQ6 some time ago … but I haven’t done anything about it.

Now over at Allyson and Nicole’s blog (were these gals reading my mind?), there is a challenge going on to make a red/white/cream quilt and I signed on. Step 1 is done.
Looking around in my stash, I have found these so far. Where in the world did they come from and how come so many found their way into my stash? Remember, I’m a blue kind of gal. Step 2 is done.
Here are a few of my blocks so far. Step 3 is started and that is a good thing.
Looking at my stash of reds, I predict there will be a few more red/white quilts to talk about.
Have a great day!
BTW ..... if any of you want to know more about the quilts shown above, just click on Quilts at the bottom of this post (last line where it says Labels: Quilts, Challenges) and there are pages and pages and pages for you to read and where you can look at my quilts more closely.

Monday, October 26, 2009

Aussie gifts and an UFO

I have been ever so lucky lately to receive gifts from a couple of Aussie ladies! :o)

Firstly, Jennifer gave me these lovely Aussie fabrics and calendar when we first met a few weeks ago (where has the time flown?). There was some chocolate …. but that went away rather quickly …Last Friday, I said my goodbyes to Jennifer and her DH. They fly home to Australia tomorrow. Will we ever meet again? It was lovely meeting them and you just never know who you will meet while blogging. Have a safe journey home, Jennifer and Kevin.

Secondly, I won a giveaway from Julia and her package arrived this past Thursday. After picking up all the gals and driving to the quilt show on Friday morning, we parked in the parking lot and had a mini show and tell. We all did a lot of oohing and aahing over a Halloween quilt that Jennifer made and Julia’s items that were in the package. Thank you Julia …. they will be well displayed this coming Xmas.
In my last post, I showed a photo with my quilts and UFO’s. Looking over some of those unfinished projects and the stage where they are at, I’ve decided to finish this project. All the HST’s were already made and trimmed and just sitting in a container. This week they have been made into pinwheels. It will be so good to finally get this top finished. Even Hank agrees with me.

Have a great day!

Tuesday, October 20, 2009

Aussies in town

Jennifer from Bronze Wombat is in town with her DH to visit their son and Kiera Oona. I have been busy showing her the quilty side of life here in Toronto. We have been to a couple of quilt shops and the Creative Festival this past weekend. I won't show you my fabric that was purchased, but shall we say that there has been a vast enhancement to my stash ......

Today, my DH and I hosted Jennifer and her DH to lunch at my place and to a viewing of my completed quilts and some finished tops and lots of UFO's that have never been posted on my blog. Let's just say that she had an advance peek of stuff to come next year.

Here we are in our basement (which is something that Aussies don't have back in Australia). Did any of you notice that fine cast on Jennifer's arm? She fell and broke it last week. It was certainly not the souvenir that she was hoping to bring back home.

... and this is part of the aftermath of my show and tell. Even Hank is probably wondering 'what happened'?
Friday morning, Jennifer, Kiera Oona, Debra (from Patchwork Sanity) and myself are going to a quilt show in Ajax and then lunch afterwards. Should be a lot of fun.
Have a great day!
Edit ..... they are visiting their son (not only Jennifer's son) ..... oops.

Monday, October 12, 2009

I'm trying my best to get some UFO's finished before New Year's Eve (a challenge that Finn is having) .... but Hank is constantly coming over and climbing onto my quilt frame to see what I've been doing and then settles down for a nap. How can I quilt with her on my quilt? So after some gentle persuasion, she moves off to find a better place to sleep. .... but she is back and has brought a friend. Ashes is waiting her turn to see what I have been doing.
So, you might as well have a peek too!
Have a great day and to my fellow Canadians, Happy Thanksgiving!

Friday, October 9, 2009

Turning Leaves again


Park City Girl is having another on-line quilt festival and this is my entry. I showed this a few years ago and the time is right to show it again. Fall is definitely in the air here in Canada ..... the night time temps are below 10C and daytime tems are in the low teens. Colours are changing all the time.
This quilt was given away to a niece and each time I look at the photo, I am thinking of making another for myself. The leaves are hand appliqued and the quilt is hand quilted.
So enjoy this quilt again and check out all the other quilts that are entered here.
Have a great day!
Pattern Source: Quiltmaker magazine, September/October 2002, No. 87
Quilt Size: 54" x 70" ... a nice size to cuddle under and stay warm.

Monday, October 5, 2009

I Love Stars

This little mini was made a few years ago. For such a tiny little thing ..... there sure was a lot of paper piecing going on to make those hearts and stars. It is hand quilted.

Pattern Source: Miniature Quilts, issue #31 (quilt title: Don’t Tread On My Heart)
Have a great day!

Monday, September 28, 2009

more Pressed Flowers ...

This top is coming along very nicely .... if I say so myself! :o) I just love the scrappy look. Between my Lover's Knot and this pattern, my charm squares have vanished from my stash. What is a girl to do? Well ..... buy some more!
These came from Fat Quarter Shop and I'm keeping tabs on some new ones that will be coming out this fall. Love those charm squares!!!!
Have a great day!

Thursday, September 24, 2009

Finish 3?

Are you up for a challenge? Finn is having another finish up some UFO’s by New Year’s Eve challenge. Last year she had this same challenge and I finished a couple of oldies but goodies …. and I have joined her again this year and will commit to finishing three. On the left is my Dresdan Plate (this quilt was part of last year's challenge and it never got done). Just need to do some more machine quilting in the blocks and something in the borders. Have you guessed applique? Score 100 points! :o)

On the right is my siggy swap quilt that I participated in this past spring. The centre has been machine quilted and only the borders remain to be done and they will have some hand quilting.

In case you are wondering ..... yes, I mix machine quilting and hand quilting together on my quilts and I love the look.

This little hanging needs something in the centre and a light bulb will go on at some point. This is a return favour to a lady down under and I need to get this done and mailed to her before the snow flies.

So, these are my three quilts that I hope to have done by New Year's Eve! Wish me luck! :o)

Have a great day!

Monday, September 21, 2009

Another top

This is the version of Humble Pie that is in Kim Diehl's book Simple Traditions ........ ..... and this is my version ......
A little bit different, eh! I just loved her applique star flowers in the border and adapted it slightly to suit me.
Yes, another top done ..... and this one is number 3! Our cool fall weather is fast approaching and I need to have projects for hand quilting to work on this fall and winter. It will sure be a hard choice of which one to work on! :o)
Have a great day!

Wednesday, September 16, 2009

How to .... Lover's Knot

Well, my Lover’s Knot pattern sure generated a lot of interest and questions which I will try to answer for you.

The majority of these blocks were made with Repro charm squares with other fabrics from my stash thrown in to add to the overall look. There are some Asian fabrics in there, too.

I have been collecting packs of charm squares for a few years now and always buy two packs of the same line. Why? I don’t know but this is something that I just started to do and it sure paid off with this quilt.

I used EQ6 for this pattern and I chose to have seam allowances on my print out (except for the leaf template which I chose to cut off). My blocks were hand pieced and these instructions are based on that. Sorry, I can’t help you if you want to machine piece your blocks.

So, for those of you who have this pattern or who want to try this pattern, the following is how to make those blocks.

A - Take a photocopy of pattern templates (you will never know when the original will come in handy again) and glue onto a piece of acrylic plastic (using a glue stick, place glue on the printed side of the photocopy). Once glue is dry, cut out your plastic templates. Nexcare tape (thanks Janet for the tip) on the back of the templates help to stop them moving around once you start to cut out pieces of fabric. Punch holes in the templates to use for pinning templates onto your fabric.
B - Since my blocks measure 5” square (4-1/2” square finished), take two 5” x 5” charm squares (they must be the same fabric) and pin the background template in place with pins and cut around the template. Be sure that each charm square has the straight of grain going in the same direction. It sure helps to keep the square flat and not go all wonky.
C - The remaining portion of the charm squares will give you one leaf and 2 small squares for the corners. For the leaf, trace around the template with a washable marker and when cutting the fabric, be sure to add seam allowance all around.

D - Take 2 more charms and repeat the process and so on. Mix up your fabrics so that your blocks don’t end up with a negative and positive version.
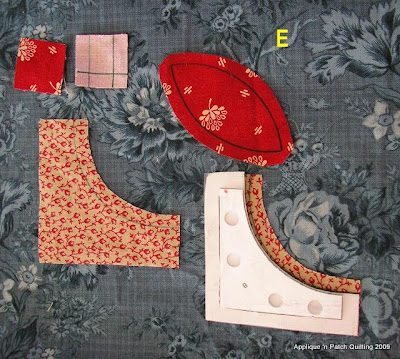
E - Time to mark your fabric pieces with ¼” seam allowance. I used Crayola washable markers.
For the background template B, I made an extra photocopy and cut out the seam allowance in the curve part. I just place that new template on top of the fabric and draw in my seam allowance.

F - Take one of the corner squares and find the straight of grain on both the square and the background fabric, sew the corner square starting at the intersection point of the seam as per the photo. For hand sewing, I do a simple back stitch. For this photo, it turned out that the straight of grain was up/down. It can also be sideways and that would be OK too.

G - Sew on the other background section starting and stopping the stitching line as shown. Don’t worry about straight of grain for this piece.

H - Before cutting my thread, finger press open the seams and place a few tacks to hold the seams open and in place (just don’t stitch through to the front).

i - Prepare the leaf section as per your favourite appliqué method. For me, for this leaf, I chose to fold back my seam allowance and do a running stitch around the piece.

J - This is how your piece should look on the backside.

K - Pin the leaf section onto the background section. Notice how I don’t match up the leaf point right at the intersection of the background and corner square? The reason being is that as you stitch from the bottom point to this point, the leaf section will actually start to shift down and when you come to the intersection, the points will then match up.

L - This is what the finished block should look like. Because of the many markings on the block, I prefer to wash my blocks in batches thus getting rid of any markings before I start to assemble these blocks into larger bocks and iron the seams.

So, have I inspired or scared off any of you into making this block?

I started this project Feb. 2008 and did not work on it all the time. So, it is doable. The small blocks were done by hand piecing and hand appliqué and then machine sewn in sections alternating a light background with a dark background.
Collecting those small charm packs has started me on my way to collecting repro fabrics and I now have a nice tidy stash to work with for future projects. The quilt you see in this photo will be the next one that I will be making with these fabrics; but that will be for another day.

Have a great day!