Showing posts with label embellishments. Show all posts

Friday, September 8, 2017

Up for the Challenge

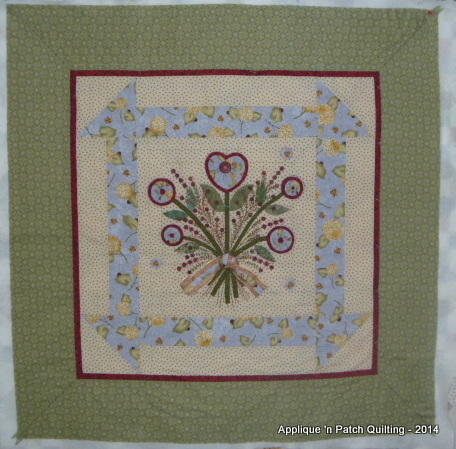
Now that my wall hanging is blocked and dried, here it is hanging in our dining room.
Now for the details of how this hanging came to be.

This was a night guild (Northern Lights Quilter's Guild) mystery challenge back in 2014.  I'm not good at mysteries.  I have to see everything before even starting to work on something.  So, month after month the challenges were given out and saved by me.  After 6 months, the challenge was over and I could finally start.  I knew what to do.

First month, we were given the challenge fabric (the fabric on the right hand side of photo) and the directions were to make a flower.  We were instructed to think outside the box.  Why not a yo-yo flower?  How about four flowers?  That works for me.  A bit of red behind the flowers gave them a bit of pop.
Notice all the red buttons?  They were saved from all the thrift store shirts that have been bought over time.  I knew they were destined for something.

Don't forget to notice the hand quilting.  First time red thread was used.  My thread is not quilting thread.  I use Coat's Button and Carpet thread.  It is thicker, but not as thick as perle cotton.

Next month was a heart.  Could I manage a yo-yo heart?  It would add to the theme.  The heart was a bit tricky, but it worked out.  Again, a bit of red behind the heart to make it sparkle.
Then an insect.  Nothing elaborate here.  Just fussy cut out a butterfly.  Three butterflies to be exact.
Another challenge fabric was given out and a bird to make.  Hard as I tried,  I couldn't fit a bird into my design.  Think outside the box, we were told.  So, I did.  Put the bird on my label.  :o)
 Then an object.  I know, how about a ribbon with the challenge fabric on it.  Works for me.
The final part to the challenge was to make a block, any block of our choice.  A churn dash block was my choice.  The size of this block was 24" x 24" finished and it would frame my flower bouquet perfectly in the centre.
To finish off the look, a bit of embroidery was added here and there along with red buttons.
Overall size is 36" x 36".
So, that is how my challenge quilt came to be.  Think outside the box.  I think I did!
Have a great day!

Monday, June 26, 2017

Adding embroidery

While I am adding borders to the tops in my previous post, at the same time, this oldie has been revived to have some embroidery added.

The last time this was shown was back in July 2014.  As far as I was concerned it was a finished top ready for hand quilting.
It even had the centre part (where the flowers are) hand quilted.  Then I stopped.  Something was missing.

You know how much I love playing the 'what if' game.  So, what if some delicate whispy stems were added to the borders?

Can you see the hand quilting at the top of this photo ?  The backing had to be carefully folded and pinned back away from one side so that the embroidery could be added.  A few adjustments to the design and then I was working with needle and embroidery floss.
Two sides are done.  Now we are talking.  This is the something that was missing.  In this photo, you can just barely see the backing folded away from the left side of the hanging.
Three sides done.  Oh my.
Four sides.
Buttons were pinned on at the ends of each stem to see if this is the look that I wanted.  Oh yes!
Huge difference, wouldn't you say.  The before and after is amazing to me.
Now, I can finish the hand quilting.  The rest of this hanging has been marked up with quilting designs and is now ready and packed in a bag with all the notions needed for hand quilting.  This will be perfect for quilting during the cool mornings at the cottage.

Ah, life is good!

OK ... now back to those borders!

Have a great day!

Wednesday, July 9, 2014

FQ Challenge

Well, after three days of embroidery work and embellishment, this is where my FQ Challenge is at.  What a huge difference it makes to my top.


It went from this:
To this:


Some time ago, I purchased a large package of assorted buttons and inside were all these small red buttons.  So perfect for this project.
Now, it is time to sandwich this top and do some hand quilting.

Have a great day!

Saturday, July 5, 2014

FQ Challenge

With my Oh Wonderful, Summer's Here project, it is at the stage where more prepping work has to be done.  Perhaps by the end of our summer, you might see new photos of it.  The last section is so tantalizing close to being finished!

While I prep, there will be other projects that are being worked on.  Do you want to see a new top that I've been playing with?


I haven't shown this piece before and my story needs to be backed up a bit for explanation.  Below is how it got started.

One of the guilds that I belong to, Northern Lights Quilter's Guild, had a FQ challenge using this fabric:

 and from it, we had to do the following:
  • make a flower
  • make an insect
  • make a heart
  • make an object
  • make a block
At our guild's December 2013 meeting, everyone was given a FQ and the challenge was explained.  The challenge started in December 2013 and each month we were given the different items to make.  I waited until the last item (at our guild's May 2014 meeting) was announced and then got busy.

This is my block.  It measures 25-1/2" x 25-1/2" and the center is 15" x 15".  There will be outer borders, but this was the starting point.
For my insect, the butterfly in the fabric was fussy cut  and made into circles:
For my heart, what about a yo-yo heart (can you see my three insects)?
For my object, a bias strip of fabric was sewn onto some ribbon to make a bow:
For my flower, I might as well stick with the yo-yo theme:
The heart and flowers were backed with red so that they would stand out and not fade into the background fabric.

Then we were given a choice of fabrics (this was my choice) to make a bird:
My bird just didn't fit in the overall look, so I decided to make it into a label.  We just had to make a bird and there was no rule on the placement.  We are always encouraged to think outside the box and I did just that!  :o)  For my bird, the back side of the fabric was used.  Details will be added to the label once the quilt is finished and then the label will be sewn onto the back of the quilt.
This is what my block looked like before outer borders were added:
Borders really help define the look and I can't believe how quickly this top went together.
In my close-up shots, you can see a lot of drawings/scribblings.  This is where embellishment comes into play and that is what I'm doing now.  Playing with beads and buttons and embroidery.

Working on this new challenge reminded me of a swap that I did way back in May 2008.  This is the little wall hanging that was made and I have always wanted to make another one for myself.  Time slipped away and I never did make one for me until now. 

Have a great day!

Sunday, December 30, 2012

Last finish for 2012

Life was very busy for me this month .... from looking after a family member following surgery, painting and getting ready for Xmas, I felt that I was being pulled in all directions.  Things have calmed down now and it is my time to play again.

A bit of quilting got done, but not much.  My Love Is did get finished.  Now that is such a good feeling of accomplishment.  :o)


Finished size:  38-1/2” x 53”
 
Hand quilted and hand embroidered.
 
Pattern source:  Pacific Patchwork

What will 2013 bring for me?  As usual, I will concentrate on my UFO's again and again and again!  :o)  They are always there for me.  Like comfort food, one can never have enough!

DH and I will be starting renovations in our home.  That will mean not as much time spent in my studio.  Oh well, I can't have my cake and eat it to.  At least not for now.

Miss Hank is doing well.  We are so grateful about that! 

Wishing you all a Joyful 2013! 

Have a great year!

Sunday, February 19, 2012

Let it Snow

This is the mini quilt that I made for Mary of We 3 Quilters that I talked about in my last post. A close-up of my hand quilting. There is machine stippling in the tabs and in the snow globe. Everything else is hand quilted. From time-to-time, I do like to do both machine and hand quilting in the same quilt. Oh well, call me quirky. :o)

Beads were added for decorations and jingle bells were sewn onto the tabs.


Where did this design come from? From Quiltmaker's 100 blocks, vol 2.

This is the snow globe pattern.


The tab idea came from this block in the same magazine.


Have a great day!

Wednesday, December 28, 2011

SSCS from and to ...

Once again, we all have to thank Miss Chookyblue for doing another fabulous job in organizing this swap and once again, I have received another wonderful gift ...... from Ilene in Australia. What can I say, except .... I love my tree hanging! I will have to try and figure out how she did this. There is a lot of fabric folding going on here and it is intriguing to me. I will enjoy my calendar this coming year. Thank you, Ilene for my treasures!

At last, I can reveal my gifts that were sent to Tracy. This moose plaster ornament was hand painted by me. I have been doing these for years and still have a nice stash waiting to be painted.

This is the wall hanging that she received.

Below photo shows some hand quilting being done ......

Tracey, you were so lucky that my package got sent off in a timely manner. Miss Ashes did her best to impede my hand quilting work by constantly putting her back paw on my hand.

A close-up shot of the hand quilting with all the markings washed out (Crayola Washable markers).

Those buttons really added to the final look.

I do like how the embroidery turned out.

Where did the ideas come from? Well, for a start, the scrolled pink border came from this pattern ....

.... in this magazine.

The embroidery pattern .....

..... came from this magazine.

This will be my last post for this year. I do want to wish you and your family all the best in 2012.


Have a great day, eh!