Showing posts with label Schoolhouse quilt. Show all posts

Thursday, January 19, 2023

School House

Well, this quilt has been long in coming!  It has quite the story behind it too.  So, let's begin.


There are a few posts about this quilt and it is best to start at the beginning and you can click onto them here to read about the start and the progress along the way:

Mar. 2, 2011 .... May 23, 2011 .... June 16, 2011 .... June 25, 2011 .... Jan. 19, 2013 ....  Jan. 30, 2013 .... Mar. 30, 2013

There could be others, but I couldn't find them at the time of writing up this post.

After this top was finished, it sat for many years.  Why?  Hand quilt or machine quilt?  That was my hang up.  In the end, it was sent to my lovely LAer and she did her magic very quickly and then it sat waiting for binding.  Enter no-blog Mary and our monthly binding challenge and ..... viola ..... this quilt is finally done and hanging in our dinning room.  Oh, such joy to finally have this gorgeous quilt finished.

Now, after reading all those posts, there is a titbit that was never written about, but it is time to talk about it.

I've given credit to Andrea Blackhurst as the designer of this quilt pattern.  She may be the designer as per the quilt in the quilt magazine, but I based my quilt on that raffle quilt at the Kingston, Ontario, Canada quilt show and they based their quilt on an antique quilt. So, IMHO, I do think the original designer is the person who made that antique quilt.

When Andrea contacted me and claimed she was the designer .... fine .... I'm happy for her and she designed a gorgeous quilt and I've since amended a few of my posts to give her credit.  She also mentioned to me that if ever I wrote a pattern for sale, she would sue me.  Oh my .... 

If you have been a reader of my blog for many years now ..... never, ever have I offered any of my designs or drafts of quilts for sale.  I think I was tested not too long ago if there was a pattern for this quilt.  Was she a friend of Andrea's?  I was suspicious at the time.  Anyway, there is not a pattern for sale and there will never be from me.  Instead, I did a tutorial and it is on the link for June 25, 2011.

If you are interested in a pattern, Sentimental Stitches has a pattern for the houses and you can purchase it here.  Gay did this quilt as a free BOM and then retired it and then brought it back for purchase.  I knew that Gay would have her pattern for sale at some point and gave her a head's up about potentially being sued by Andrea.  Gay wrote back and said that she had a team of lawyers to work out any copyright issues.  After she looked at my posts, Gay thought that my quilt was different from Andrea's and I could claim it as my design.  Thank you and that was a surprise comment!

So, I will leave it up to you who is the designer .... but .... I think I will just enjoy my efforts and the struggles and simply enjoy my quilt .... as a quilt.

Quilt Details:

Started:  Feb. 2011

Finished:  Dec. 2022

Block size:  12" finished and 6" finished

Quilt size: 81-1/2" x 83-1/4" (top size before quilting, washing and drying: 85" x 86")

Batting:  Hobbs cotton/poly 80/20

Machine quilted by:  Kathy Wareham using Clam shell Feather by Christy Dillon of My Creative Stitches.  

I enjoy designing quilts and also making quilts from a pattern (usually with some kind of twist) and credit is given to the designer of those patterns.   That's it ..... I just love making quilts.  Not selling them, not going into pattern writing, etc.  That is way too much work.  Writing a tutorial takes a lot of time and effort and I no longer write those anymore.

I have seen some of my designs or part of my designs published by others.  Intentional?  Who knows.  I'm not going to send those folks threatening emails.   A few bloggers have approached me and asked permission to make and publish a pattern from one of my designs.  They were given permission and I have received a finished pattern as a 'thank you'.  I was happy for them.   As you probably have guessed, I'm a giving sort of person and not spiteful.  Life is too short.

Cherish your day, cherish your life!

Saturday, March 30, 2013

Schoolhouse is a top ... haunted no more

I have had quite the journey with my schoolhouse quilt and at last it is a top.  Come along and I will show how my borders came to be.

Once my centre blocks were all assembled and sewn together with the sashings, the time had come to decide on the borders. 

Numerous red fabrics were pulled and auditioned along with different versions of stars. This is the final selection for the borders.  I definitely love the two different star sizes.

Once the borders were sewn on, it helped to define the look and to help me decide if I was going in the right directions with those stars.
The more stars were made and pinned onto the border, the more I was falling in love.
 Then, I thought about putting small circles inside the larger stars.  Yes, that will do quite nicely!  :o)
After sewing a few stars on each night, I would pin my top onto my design wall and sit back in my chair and drool and pinch myself if this was real.  Seeing my progress each night kept me motivated to finish the border and this top!
Here is a close-up of the stars:

At last, my top is finished and I am haunted no more.  Haunted?  Read on.
My love affair with this top all started with this quilt below.  DH and I stopped in at the quilt show (May 2005) in Kingston, Ontario on our way from Toronto to Quebec City to visit family there.  We only had a few hours to do the show and DH snapped photos of the quilts while I browsed the vendors and the guild booth.  This quilt haunted me.  Was there a pattern?  Debra was also at this show (before we became friends) and every so often we would talk about this quilt and again asked: "was there a pattern"?  Finally Debra and no-blog Mary asked if I could draft up the block.  Well, yes, I think I can?  It wasn't easy drafting that pattern, but finally it came to be.   You can go here for a tutorial on how to make your own block.

It turns out that the Kingston guild had a blurb about this quilt at the time of the 2005 show.  The quilt that inspired the guild ladies to make this quilt came from Donna Thomas.  You can go here to read more about it.
Then, a few days after I finished sewing the last star onto my top and exactly 2 years after I first posted about this quilt here, an email was received from the designer and copyright holder of this pattern.   Andrea Blackhurst is her name and her pattern appeared in Quilt magazine, fall 1996.  The photo below is how this quilt appeared in the magazine (thanks Andrea for giving me permission to use your photo). 
My version of THE quilt is made and I'm haunted no more!

Now, it is time to get on with another UFO!

Have a great day!

Wednesday, January 30, 2013

Houses are blocked

Can we say 'y a y'!  My school houses or houses are now blocks and I'm so glad that they are done .... and they look awesome!!!!!  These photos just don't do the colours and the blocks any justice at all.

Now, I'm in the process of sewing on sashings (see bottom 2 rows).  Wanting something subtle, the sky fabric was chosen and I do think it will work nicely.
Once the sashings are done, then the outer borders can get put on.

I have been getting requests where this pattern can be purchased.  You can't .... you have to make your own.  There is a tutorial on how to draft your own house block by going here.

Yep, I'm doing the happy dance!!!!

I'm trying my best to stay away from starting new projects.   My stack of UFO boxes is slowly starting to dwindle and I can see the light at the end of the tunnel (mind you, it is only a flicker).  There is way too much temptation out there in blogland and I have to keep reminding myself to say 'no' and be content to just work on my UFO's ..... for now.  :o)

Have a great day!

Saturday, January 19, 2013

School houses

It is so good to read on other blogs about quilters and their UFO's and how so many are tackling that problem.  Not wanting to be left behind .... me too, I'm digging into my UFO's.

This time around, it is my school houses.  Up on my design wall went my three blocks that were made so long ago.  All of the sampler blocks (they are in the bottom right hand corner of each house) have been made, but nothing else. 

 After re-acquainting myself with the templates and pieces, another two blocks got made.
My original idea was to go with just one navy blue fabric for the houses, but I didn't have enough of just one fabric.  So, another three navy blue fabrics were found and lo and behold, another four blocks got made:
All my pieces have now been cut out just waiting to be assembled.  To keep me motivated, my 'window' sections get done first and then the roof and chimneys.  This is the layout for my sampler blocks and fabric colours.  Can you see my window sections on the bottom row?  
Today, another four blocks got made in the top, second and bottom rows:
Not bad for one week of work!  I already know what the borders are going to be like, so I will keep plugging away on this project.  The going has been a bit tricky, especially doing the roof sections and I will be so glad to see the end of all those pieces.  Please, give me hand piecing any time!

Have a great day!

Saturday, June 25, 2011

School house tutorial

This has taken me a wee while to assemble and compose ... but here goes ... I'm not a pattern maker by trade and I've done my best to give your correct instructions. To make this school house block, here are your instructions.Fig.1 – draw a 12” x 12” square on a piece of paper (do not draw any seam allowances).
Fig.2 – shows some lines that have been drawn in and the measurements are shown below in Fig. 3.
Fig.3 – draw your lines according to the measurements shown.
Fig.4 – this is the section that we will be working on next.
Fig.5 – these are the templates for the window section (there will be measurements for a door for those that want a door instead of a window).
Fig.6 – the measurements below do not include any seam allowances.
A – ½” wide x 6” high B and C – 1-1/4” high x 5-1/2” wide D and E – 1-1/4” wide x 3-1/2 high F and H – ¾” wide x 3-1/2” high
G – 1-1/2” wide x 3-1/2” high
Fig.7 – shows the placement for the door
Fig.8 – the measurements below do not include any seam allowance. AA – ½” wide x 6” high BB – 1-3/4” high x 5-1/2” wide CC and EE – 1-3/4” wide x 4-1/4” high
DD – 2” wide x 4-1/4” high
Fig.9 – is the start of drawing in the roof section. Again there will be no seam allowances for this section. From the right hand side, measure in 2-5/8” and make a dot at that measurement. Using your ruler, draw a diagonal line connecting the dot at the top to the bottom on the right on side.
Fig.10 – From your 2-5/8” mark, measure 6” to the left and make another dot. Draw a diagonal line as per the drawing.
Fig.11 – After you have drawn in your diagonal line, make another diagonal line that is ½” wide as shown.
Fig.12 – Following the diagram, draw another diagonal line to complete the triangle. At the top of the triangle, it should measure 2-3/4” from the left side of your block
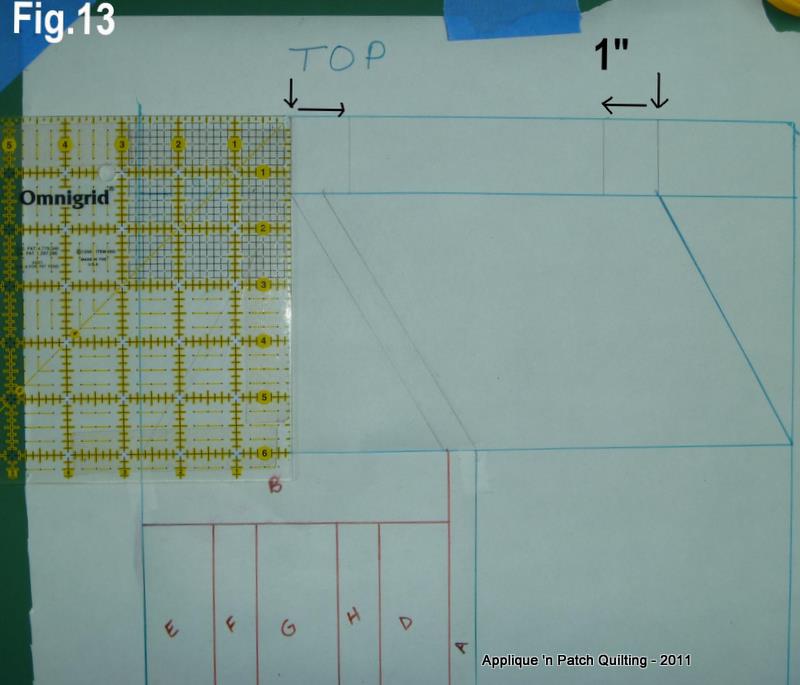
Fig.13 – This is the chimney section. From the point of the triangle at the top, draw a line straight up using your ruler to act as a guide to get a straight line. The width of each chimney will be 1” wide. Follow diagram to draw in your second chimney.
Fig.14 - This is how your block should look.
Fig.15 - I took a couple of photo copies of my roof section, added ¼” seam allowance all around each template and stuck them onto MacTac Contact paper. My templates are hardy and easy to use when cutting out on the fabric.
Now, for those special blocks that fit into the bottom right side of my houses, I used my EQ software and BlockBase that goes with it.
Here are a couple of links where you can make 6" x 6" (6-1/2" x 6-1/2" unfinished) blocks:
Cre8tive Quilter My next post will show you how to assemble the block.
Have a great day!

Thursday, June 16, 2011

Time to build .....

.... my house blocks. Now that all of my 6-1/2" x 6-1/2" (finished 6" x 6") blocks have all been made, it is time to tidy up those scraps and pieces of paper and take out the sections of my house blocks and start sewing them together. Some of you have asked about this pattern and I am in the process of writing up a tutorial on how you can draft up your own house block pattern (this will not include the smaller 6" finished blocks) and make your own quilt. That tutorial will be coming up in the next week or two. So stay tuned for the tutorial if you are interested. In the meantime, I wanted to show you how one of the more intricate blocks was made. Some of those blocks were so tricky that there was no other way for me to make them except using the English Paper Piecing method. Below, you can see some of the templates that were basted onto fabric and hand sewn together.
This is how the back looks like before being trimmed to size and all the basting and paper templates removed.
This is the block. See, is this not an intricate block?
Have a great day, eh!

Monday, May 23, 2011

School houses and Klosjes

I'm back to working on this project .... just love how this is shaping up. Just 8 more small blocks to go and the houses can get made up. The small blocks are 6" x 6" finished and the house block is 12" x 12" finished. This quilt will hang on our dining room wall .... but that won't be for a while yet. Mind you, some of my tops get hung up throughout the year. Hand quilting takes a while and I do like to enjoy my tops instead of them being stored away in a battered old trunk. There are only 10 more border blocks to go on my Klosjes quilt. I am so eager to get this done. My label is being worked on and can be added to the back when the quilt is done. Also, fabric has been pulled for a sleeve (my quilts get hung on the wall as well as being used on beds) for sewing onto the back. Soon, my friends, soon you will see this quilt finished. Yesterday, 6 blocks got quilted and today my hands are sore .... so, today I will take a break and work on something else. Probably some more blocks for my school house.
Have a great day!

Wednesday, March 2, 2011

School-house blues

Five years ago, at the Kingston, Ontario quilt show, this school-house quilt captivated my attention. It was a raffle quilt but I didn't win it. Oh darn! Still, it has been on my mind to make my own one day. Debra was also at that quilt show and she bought $40.00 worth of raffle tickets and didn't win either. Double darn! Since we started getting together a few years ago, we have been talking and talking about this quilt and decided to make our own.
March 2, 2013 - Update:  At last, the original designer and copyright holder of this pattern is Andrea Blackhurst and the pattern appeared in 'Quilt' magazine, fall 1996.  Thank you, Andrea for contacting me so that credit can finally be given to you. 

So, last Saturday, Debra and Mary (no blog) came to my house and we sewed. Below is my progress to date. For our meeting, I just had the middle house block done. I'm making the small alternative blocks using EQ7 and am having quite the time (fun) making them. Some of my blocks are paper pieced and others (the more intricate ones) I am doing them the English Paper Piecing method. The school-house block finish size is 12" x 12" and the small alternative block finish size is 6" x 6". My quilt will have 25 blocks (5 x 5) and will finish approx. 84" square. I'm not sure what size Debra's and Mary's will be. Time will reveal all our blocks and quilt sizes.

Now, for my 'show and tell', I had quilts in 3 separate piles around my house. There was no way they could be shown all at once as it would have been quilt overload. Miss Hank had to be coaxed off this pile. Ummm ... can we say princess and the pea ... but she sure does look cozy.

This is the aftermath of one showing. To all those ladies who have given me giveaway quilts and swap quilts .... your ears must have been burning as your quilts were greatly admired. It was fun to show the ladies my quilts and other quilts from around the world. Both Debra and Mary are participating in swap quilts and blocks and they have shown me their recent exchanges.


Oh yes, we had a fun day!

If you want to see another version of a school-house quilt go here and scroll down.
Have a great day!
BTW .... oh yes, one more project to be added to my UFO list for a total of 33 projects and 7 tops to be quilted. What can I say, that is life! :o)