Another quilt done! Done, done, done!
Yee haw!
I'm always on the lookout for a place to take photos of my quilts and this spot has been on my list for a couple of years now. This is on a bridge on our cottage road. There will be more quilt photos taken here, so be prepared to see this spot often .... until the snow flies. LOL
I so wanted to capture the beauty of this spot. How about my quilt on the rocks? Jeesh ... that sounds like a drink!
While I was busy snapping photos, my sister was snapping me in action. Ha!
How about over the bridge railing? The other side of the railing is even more beautiful and that will be the spot for another quilt soon.
How about at the cottage hanging on the old shed door?
What about laying in a field of daises and buttercups? You are probably thinking that the quilt got dirty being laid out in all those different spots. It will get washed soon. Just not today.
All these photos were quickly taken as the MOSQUITOS were horrendous!
Even the wildlife can't stand them. On our way home from the cottage, there was a moose standing in the middle of the highway. Wouldn't move until it was ready. What a sight to see and not a camera at hand to snap that photo. Oh my, what a lost opportunity.
My quilt is a split apple core. I just made the apple cores a bit bigger (3" x 4-1/4" finished). Once the cores were all sewn together, they were then appliqued onto a strip of green fabric. Apples + green peel = Granny Smith. That is how my quilt name came to be. LOL
A close up of the split apple cores.
Quilt details:
Quilt source: saw a photo on Pinterest and went from there
Quilt started: October 2014
Quilt top finished: Sept. 2018
Quilt finished: June 2019
Quilt size: 95" x 101-1/4" (it still has to be washed and dried and then the measurements will become smaller)
Batting: Hobbs polyester
Machine quilted by: Kat's Quilts
So, that is another top to be crossed off my list.
We will be celebrating Canada Day on July 1 and since I will be at the cottage, I'm wishing all my fellow Canadians to have a great day, eh!
Showing posts with label Hand Piecing. Show all posts
Saturday, June 29, 2019
Wednesday, November 7, 2018
Lover's Knot
This is, by far, my favourite quilt. I loved making it and now that the quilt is done, I love it even more.
How did this quilt get started? The blocks are all hand pieced and then sewn together by machine. Hand piecing!?
Back in 2004, Jenny Beyer wrote an article in Quilter's Newsletter Magazine about her journey with hand piecing. Hand piecing. Not a chance, I snorted after reading the article. Not a fricking chance.
Flash forward to early 2008. I had a lot of charm squares and a need for a take-along project for me to work on when travelling back and forth between Toronto (where I lived then) and North Bay to look after my Mom. Perhaps it was on Pinterest that I saw a quilt and decided this was something that I could easily start and have with me to work on. My Mom loved to see what I was working on. The VON nurses that came to the house loved to see what I was working on. So, why not. But hand piecing. Really, Rosie, hand piecing? I know, I know, I'm eating my words. Hand piecing.
At first, I wanted to do just a little wall hanging or at the most a lap-size quilt, so that I could say that I tried hand piecing and be done with it. Instead, this quilt grew and grew and grew. I went a little overboard. LOL
There is even a tutorial on how to do this if you are so inclined to make one too. Visit here: https://appliqueandpatches.blogspot.com/2009/09/how-to-lovers-knot.html I did this tutorial because there were a number of queries on how I did them. It was easier to just show everyone in one tutorial.
I'm done with hand piecing. During the process, I decided that this method was not for me. EPP showed up and that is what has caught and maintained my interest. Still, I'm glad that I tried it out and can say that I did hand piecing at one time. Can you?
Quilt Details:
Started: February 2008
Top Finished: July 2018 (it sat around waiting for the perfect fabric for the border since September 2009 ..... sheesh)
Quilt Finished: September 2018
Quilt Size: 99-3/4" x 99-3/4" (102-1/2" x 102-1/2" before quilting, washing and drying)
Block size: 4-1/2" square unfinished
Pattern Source: The block pattern was found on Blockbase which is a stand alone computer software design.
Batting: Hobbs poly. I prefer a poly batting for winter quilts as it maintains body heat.
Machine quilted by Tella in Scarborough.
This quilt is nice and cozy warm for our winter months.
Linking to: http://estheraliu.blogspot.com/ and http://needleandthreadnetwork.blogspot.com/
How did this quilt get started? The blocks are all hand pieced and then sewn together by machine. Hand piecing!?
Back in 2004, Jenny Beyer wrote an article in Quilter's Newsletter Magazine about her journey with hand piecing. Hand piecing. Not a chance, I snorted after reading the article. Not a fricking chance.
Flash forward to early 2008. I had a lot of charm squares and a need for a take-along project for me to work on when travelling back and forth between Toronto (where I lived then) and North Bay to look after my Mom. Perhaps it was on Pinterest that I saw a quilt and decided this was something that I could easily start and have with me to work on. My Mom loved to see what I was working on. The VON nurses that came to the house loved to see what I was working on. So, why not. But hand piecing. Really, Rosie, hand piecing? I know, I know, I'm eating my words. Hand piecing.
At first, I wanted to do just a little wall hanging or at the most a lap-size quilt, so that I could say that I tried hand piecing and be done with it. Instead, this quilt grew and grew and grew. I went a little overboard. LOL
There is even a tutorial on how to do this if you are so inclined to make one too. Visit here: https://appliqueandpatches.blogspot.com/2009/09/how-to-lovers-knot.html I did this tutorial because there were a number of queries on how I did them. It was easier to just show everyone in one tutorial.
I'm done with hand piecing. During the process, I decided that this method was not for me. EPP showed up and that is what has caught and maintained my interest. Still, I'm glad that I tried it out and can say that I did hand piecing at one time. Can you?
Quilt Details:
Started: February 2008
Top Finished: July 2018 (it sat around waiting for the perfect fabric for the border since September 2009 ..... sheesh)
Quilt Finished: September 2018
Quilt Size: 99-3/4" x 99-3/4" (102-1/2" x 102-1/2" before quilting, washing and drying)
Block size: 4-1/2" square unfinished
Pattern Source: The block pattern was found on Blockbase which is a stand alone computer software design.
Batting: Hobbs poly. I prefer a poly batting for winter quilts as it maintains body heat.
Machine quilted by Tella in Scarborough.
This quilt is nice and cozy warm for our winter months.
To end this post, how about a sunset photo taken in our backyard. Now that the leaves are off the trees, the sun can shine through and show us what mother nature can do. Beautiful!
Have a great stitching day!Linking to: http://estheraliu.blogspot.com/ and http://needleandthreadnetwork.blogspot.com/
Wednesday, September 12, 2018
Triangles for a little one
My modern triangle quilt is done and given to my little niece for her big-girl bed. This quilt is so different from my usual, but it was fun to work on something different for a change.
My niece (her mother) showed me a photo of a triangle quilt that she found on Pinterest and sent it to me with a selection of colours for me to follow. She knew that I would be adding my own twist to the mix. Yep, I sure did. The walls in my little niece's room are all painted different colours that are in this quilt. What an interesting idea and look. Her room is definitely not boring and my little niece is quite proud of her room. My sister and I babysat her on Saturday and I asked to see her room with the quilt on the bed. My little niece scurried upstairs to her room and closed the door waiting for my sister and I to climb the stairs and when we were all ready, she opened the door with a ta-da. So funny.
A simple grid pattern was quilted.
A striped binding finishes this quilt perfectly.
The back. It was time to do something creative with the backing. I've long admired quilts that have interesting backings and since there were quite a bit of leftover triangles .... well, why not do something with them.
Note to self .... if ever doing a creative backing like this, do an allover machine quilting design. The horizontal stitching looks not too bad here.
But, when I pan out, you can see where my horizontal stitching line wavers here and there. Oh well, it is what it is. I tried really hard to keep the top and back straight and lined up as much as possible when basting all the layers together and didn't do too badly.
It just looks so odd to not have any borders on this quilt.
Quilt details:
Quilt size: 50-1/2" x 77-3/4" (top size 53" x 81" before washing and drying)
Started: November 2017
Top Finished: July 2018
Quilt Finished: September 2018
Batting: Hobbs poly batting
What else am I working on?
Sewing binding for this hand pieced quilt and using up more of my precious striped fabric.
Adding applique to this border. Another EPP project almost coming to an end!
Those two items will keep me out of trouble for a few weeks. LOL
One trunk show was done this past Monday at my night guild. Another trunk show this coming Tuesday at my day guild and then one more trunk show and workshop in October.
For the day guild trunk show, my friend and I were asked to spend more time explaining how we did our quilts. There was a little buzz after the night guild showing and we seem to have sparked an interest. Oh joy! Who else can we get hooked doing EPP?
Have a great day!
Linking to: http://estheraliu.blogspot.com/ and http://needleandthreadnetwork.blogspot.com/
My niece (her mother) showed me a photo of a triangle quilt that she found on Pinterest and sent it to me with a selection of colours for me to follow. She knew that I would be adding my own twist to the mix. Yep, I sure did. The walls in my little niece's room are all painted different colours that are in this quilt. What an interesting idea and look. Her room is definitely not boring and my little niece is quite proud of her room. My sister and I babysat her on Saturday and I asked to see her room with the quilt on the bed. My little niece scurried upstairs to her room and closed the door waiting for my sister and I to climb the stairs and when we were all ready, she opened the door with a ta-da. So funny.
A simple grid pattern was quilted.
A striped binding finishes this quilt perfectly.
The back. It was time to do something creative with the backing. I've long admired quilts that have interesting backings and since there were quite a bit of leftover triangles .... well, why not do something with them.
Note to self .... if ever doing a creative backing like this, do an allover machine quilting design. The horizontal stitching looks not too bad here.
But, when I pan out, you can see where my horizontal stitching line wavers here and there. Oh well, it is what it is. I tried really hard to keep the top and back straight and lined up as much as possible when basting all the layers together and didn't do too badly.
It just looks so odd to not have any borders on this quilt.
Quilt details:
Quilt size: 50-1/2" x 77-3/4" (top size 53" x 81" before washing and drying)
Started: November 2017
Top Finished: July 2018
Quilt Finished: September 2018
Batting: Hobbs poly batting
What else am I working on?
Sewing binding for this hand pieced quilt and using up more of my precious striped fabric.
Adding applique to this border. Another EPP project almost coming to an end!
Those two items will keep me out of trouble for a few weeks. LOL
One trunk show was done this past Monday at my night guild. Another trunk show this coming Tuesday at my day guild and then one more trunk show and workshop in October.
For the day guild trunk show, my friend and I were asked to spend more time explaining how we did our quilts. There was a little buzz after the night guild showing and we seem to have sparked an interest. Oh joy! Who else can we get hooked doing EPP?
Have a great day!
Linking to: http://estheraliu.blogspot.com/ and http://needleandthreadnetwork.blogspot.com/
Labels:
Applique,
English Paper Piecing,
Hand Piecing,
Quilts,
Triangles
Thursday, April 19, 2018
Cherry on Top
Another quilt done! Can you see me doing the happy, happy dance?
Label and sleeve on? Tick and tick. Done!
Quilt details:
Pattern source: internet free pattern (source is no longer available)
Hand pieced using EPP method (except for borders which were machine sewn)
Started: Fall 2011
Top finished: June 2014
Quilt finished: April 2018
Quilt Size: 94-1/4" x 93" (size before quilting and washing: 97" x 99")
Batting used: 80/20 poly/cotton
Edge to edge pattern: Baptist Fan
Machine Quilted by: Tella in Scarborough, Ontario ..... thank you once again Tella for making my quilt come alive!
I don't know about you, but I'm having a great day!
Label and sleeve on? Tick and tick. Done!
Quilt details:
Pattern source: internet free pattern (source is no longer available)
Hand pieced using EPP method (except for borders which were machine sewn)
Started: Fall 2011
Top finished: June 2014
Quilt finished: April 2018
Quilt Size: 94-1/4" x 93" (size before quilting and washing: 97" x 99")
Batting used: 80/20 poly/cotton
Edge to edge pattern: Baptist Fan
Machine Quilted by: Tella in Scarborough, Ontario ..... thank you once again Tella for making my quilt come alive!
I don't know about you, but I'm having a great day!
Tuesday, March 28, 2017
Kentucky Stars
It has been a while since I last worked on this project. The hand quilting was 3/4 done. So, a few weeks ago out it came and I've been busy working on it since. Before I knew it the quilt was done!
Then a bout of stomach flu got in the way and so it sat for five days. Once I recovered from that, the binding was done a little bit at a time.
When I got tired and needed to stop and rest (recovery takes longer at my age), the hanging got hung up on my design wall so that I could sit back and admire it.
Binding ..... DONE!
Here is my hanging washed and pinned onto my styrofoam design wall for drying and blocking
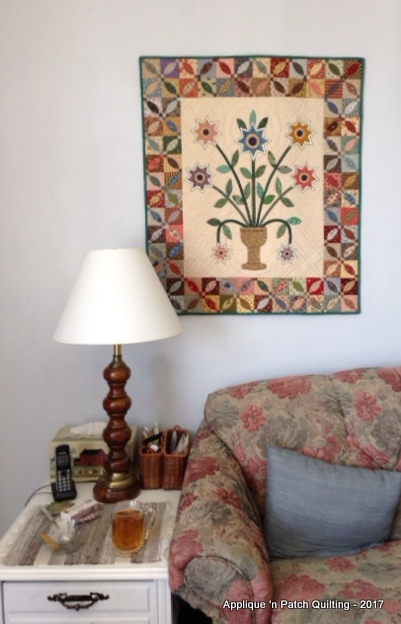
Here it is all finished and being admired on the wall above where I sit in our living room.
Oh, happy, happy, happy!
This only took 11 months to complete.
Size: 30" x 35"
There is both hand quilting and machine quilting in this hanging.
Pattern for centre came from Electric Quilt Company on one of their separate programs called Classic Applique Folk Art and it is originally known as Kentucky Flowerpot. I changed out the flowers and inserted my favourite stars instead. That is why it is called Kentucky Stars. The border blocks came from another project that I had worked on and ended up not using in that project. A perfect home was found for them instead.
So, that is another bin that can be recycled for another project because this hanging is DONE.
If you want to read more about the progress of this project, just click onto the label Kentucky Stars at the end of this post and scroll down and enjoy reading.
Have a great day!
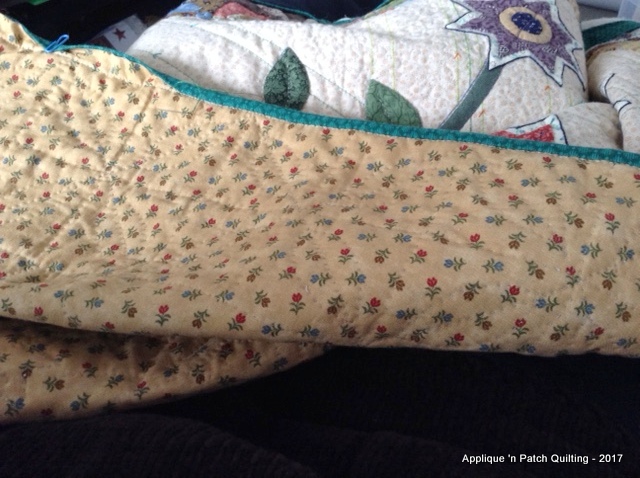
Then a bout of stomach flu got in the way and so it sat for five days. Once I recovered from that, the binding was done a little bit at a time.
When I got tired and needed to stop and rest (recovery takes longer at my age), the hanging got hung up on my design wall so that I could sit back and admire it.
Binding ..... DONE!
Here is my hanging washed and pinned onto my styrofoam design wall for drying and blocking
Here it is all finished and being admired on the wall above where I sit in our living room.
Oh, happy, happy, happy!
This only took 11 months to complete.
Size: 30" x 35"
There is both hand quilting and machine quilting in this hanging.
Pattern for centre came from Electric Quilt Company on one of their separate programs called Classic Applique Folk Art and it is originally known as Kentucky Flowerpot. I changed out the flowers and inserted my favourite stars instead. That is why it is called Kentucky Stars. The border blocks came from another project that I had worked on and ended up not using in that project. A perfect home was found for them instead.
So, that is another bin that can be recycled for another project because this hanging is DONE.
If you want to read more about the progress of this project, just click onto the label Kentucky Stars at the end of this post and scroll down and enjoy reading.
Have a great day!
Labels:
Applique,
Embroidery,
Hand Piecing,
Hand Quilting,
Kentucky Stars,
Machine Quilting,
Quilts
Thursday, January 26, 2017
Next up
The next top up for hand quilting is this wall hanging.
A close-up of what has been done so far. I did do small machine quilted meander in some parts of the centre. I do like the effect it gives. For me, there is no problem combining both machine and hand quilting together in the same quilt.
My goal is to get this hanging quilted before the end of February. That is doable.
I'm linking to The Needle and Thread Network.
Have a great day!
A close-up of what has been done so far. I did do small machine quilted meander in some parts of the centre. I do like the effect it gives. For me, there is no problem combining both machine and hand quilting together in the same quilt.
My goal is to get this hanging quilted before the end of February. That is doable.
I'm linking to The Needle and Thread Network.
Have a great day!
Sunday, December 13, 2015
A Scrappy Garden
Well, I hung in there and sewed that last row together and then tackled the borders.
A Scrappy Garden is finally a top!!! Since the centre is SO busy, the borders had to be plain to give the eye a place to rest. Yes, this works very well. This is another big top. The height is 94-1/2" and the width is 102". After it is quilted, an overall loss of 4" will occur and then this will be the perfect size for my bed.
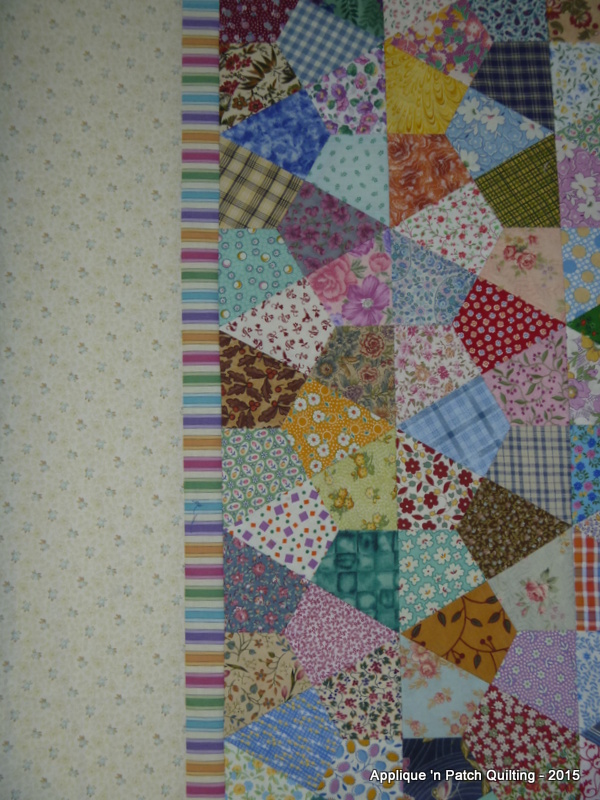
A close-up of the border. That multi coloured stripe tied in all the colours.
In case any of you are counting, this is top #26 waiting to be quilted. OMG! Can you guess what my goal is for next year?
In case any of you were wondering what else that triangle can be used for, here are a few more ideas:
Rows of these pieces sewn together. Just trim the sides and what an effect that would be.
My Aussie friend, Jennifer, brought this pattern for me using that same template.
Normally, after doing a big hand piecing project, I'm more than ready to toss those paper pieces into the recycle bin or give them away to another person who wants to attempt this pattern. This time, I think I will hang onto my drawer of these templates and let a few ideas stew for a while. :o)
Have a great day!
A Scrappy Garden is finally a top!!! Since the centre is SO busy, the borders had to be plain to give the eye a place to rest. Yes, this works very well. This is another big top. The height is 94-1/2" and the width is 102". After it is quilted, an overall loss of 4" will occur and then this will be the perfect size for my bed.
A close-up of the border. That multi coloured stripe tied in all the colours.
In case any of you are counting, this is top #26 waiting to be quilted. OMG! Can you guess what my goal is for next year?
In case any of you were wondering what else that triangle can be used for, here are a few more ideas:
Rows of these pieces sewn together. Just trim the sides and what an effect that would be.
My Aussie friend, Jennifer, brought this pattern for me using that same template.
Normally, after doing a big hand piecing project, I'm more than ready to toss those paper pieces into the recycle bin or give them away to another person who wants to attempt this pattern. This time, I think I will hang onto my drawer of these templates and let a few ideas stew for a while. :o)
Have a great day!
Thursday, June 26, 2014
Oh Wonderful, Summer's Here!
Thank you to Julie and Sue ..... I finally have a title for my no-name project! I couldn't be happier! You ladies are the best!
The last time you saw this project, it was at this stage:
Another section is ready for hand piecing. Perfect!
Have a great day!
The last time you saw this project, it was at this stage:
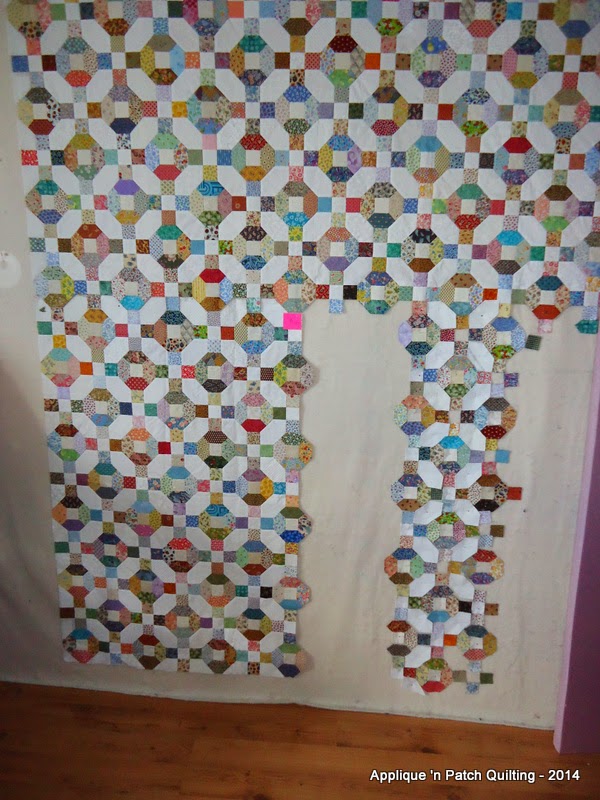
By concentrating totally on this project, this is where it is at now:
Less than a quarter to go. I really, really should finish this top this summer.Another section is ready for hand piecing. Perfect!
Have a great day!
Monday, June 23, 2014
No-name project
Well, with summer now here, the time has come to bring out my no-name project (just known as D046) and work on it, once again. This is my bring-along summer project and I have been working on it for the last few summers. Will it get finished this summer? I doubt it, but we shall see how it goes.
I just finished this little section today:
It fits into the area where the arrow is pointing below:
See ....
Starting at the bottom (see the arrow?), this is where the two sections will be sewn together.
Well, let's get sewing ....
.... and sewing ....
.... until that section is all sewn together. It was such a small section, but that is one less section to do.
Now, what about the empty space that is in the middle (to the right of the completed section)? It is here, all pinned onto a piece of cotton batting.
It just needs to be rolled up again.
Now, it is ready to be placed into a recycled store bin, along with a sewing kit and it is ready to travel at a moment's notice.
That is my summer project ..... what about you? What is your project?
Have a great day!
I just finished this little section today:
It fits into the area where the arrow is pointing below:
See ....
Starting at the bottom (see the arrow?), this is where the two sections will be sewn together.
Well, let's get sewing ....
.... and sewing ....
.... until that section is all sewn together. It was such a small section, but that is one less section to do.
Now, what about the empty space that is in the middle (to the right of the completed section)? It is here, all pinned onto a piece of cotton batting.
It just needs to be rolled up again.
Now, it is ready to be placed into a recycled store bin, along with a sewing kit and it is ready to travel at a moment's notice.
That is my summer project ..... what about you? What is your project?
Have a great day!
Subscribe to:
Posts (Atom)