Sunday, October 23, 2011

I Got Dots

You know how it is, when you see something on blogland that has you spinning wheels wanting to make it. Well, I came across this pattern on Jovita's blog and she is offering this pattern for free. She based her pattern on an old antique one and I just love how she revamped it. There are just 3 blocks and you can make any size you want to. It is really that simple .... or not .... if you don't like doing applique and especially circles. For me, I'm in heaven. So these 3 blocks soon ..... ..... became this and ....
...... eventually became this. I can't stop making them. They are so addictive.
I took Jovita's pattern for the blocks and simplified them slightly by taking out some of the circles. This slight modification works for me.
So, you know what I'll be busy working on .....
Have a great day!

Friday, October 21, 2011

A trip to the cottage

Are you tired of seeing my Trip Around the World quilts? Sorry, but here is another finished one. I love it .... and it is currently warming a family member living in Gatineau, Quebec. My quilts do travel around our country a wee bit. This quilt was machine quilted (except for some hand quilted stars in the border corner blocks). From start to finish, this quilt came together very quickly. Oh yes, I do so love these quilts and I just bought some new fabric to make another one.
Have a great day!

Tuesday, October 18, 2011

An Autumn Trip - Tutorial - Part 3

Are your blocks all done? Now is the time to start assembling all those blocks. So, here goes ....

Row 1 - follow this order for placing your blocks.

Usually, a piece of paper gets placed on the top left hand block so that when my blocks for a row are sewn together, they don't get switched around and after sewing on a row, I always know where the top part is.Fig.1 – this is what the back looks like with all the seams pressed open

Row 2 – follow this order for placing the blocks.


Row 3 - repeat Row 1
Row 4 - repeat Row 2

Row 5 - repeat Row 1

Row 6 - repeat Row 2

Row 7 - read on
This is what your 3 rows should look like.


This is how your 4 rows should look like now.


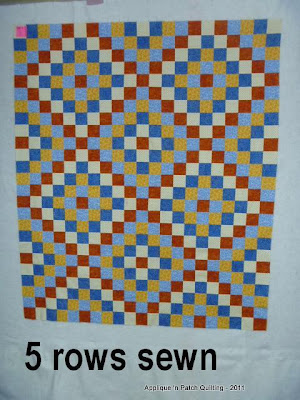
Five rows ... you are doing good!


Yay you .... your 6 rows are sewn together!


Row 7 - Now .... before you start jumping to borders, there is still one more row to add on. When you take a look at the photo in Fig. 2 above, look closely at the top and bottom ... they do not match. The design in the top row is not complete.

In Fig.3 you will need to go back to your remaining tubes and pick apart those tubes until you have enough squares to match up with the colour and number indicated. If you don't have enough tubes to do the job, then that extra fabric that you have, cut out enough 2-1/2" x 2-1/2" squares that you are missing. See, there was a reason for that extra fabric. :o)


Fig.4 - Before sewing your squares together, please make sure that on each square your straight of grain (SOG) is going up/down. To help you with this, look at your unpicked square and look where the seams were sewn together that you ripped apart. Can you see your original sewn seam? Look for needle marks. That will be your top/bottom on how to place your square for sewing. The reason for placing it this way is to ensure that this last row will match any fabric that has a directional print otherwise your eye will be drawn to those fabrics that don’t look like the others.


Fig.5 - see where the arrow on the left hand side is pointing to? This is the order for placing your squares for sewing for this last row.


Now, once that Row 7 is sewn together and onto the top, your centre portion is now complete. Take a bow .... you deserve it!

Borders

Take your border strips that have been cut out (scroll down to Part 1 of this tutorial and look under Cutting) and start working on your borders.

I sewed all the blue strips together in one long strip and the rust strips in one long strip.

Measure the width of your top in 3 places, add them together and divide by 3. That is the number for cutting out your first border for the top and bottom (this method is not for doing mitered corners)


Sew your blue border pieces onto the top and bottom.

Now for the sides, measure lengthwise in 3 places, add them together and divide by 3.


Measure out your blue border strip to that number and cut and sew onto your top.

Do this same method for the rust inner border and for the outer blue border.

That is it ….. your top is done! Bravo!!

I have done my best to ensure that there are no errors in any of these tutorials and have checked and rechecked and rechecked, etc. I apologise in advance if you do find one. Please let me know immediately so that a correction can be made.


For this tutorial, you do have my permission to copy the photos, the tutorial, etc. and share amongst friends ..... please .... just don't use any of this tutorial for $ profit.

Have fun and have a great day!

Thursday, October 13, 2011

An Autumn Trip - Tutorial - Part 2

Now that I'm home again after visiting with family, it is time to buckle down and give you Part 2 of my tutorial for making this Trip Around The World. Are you ready?

Some blocks in this tutorial will have 6 strips per block and others will have 5. Just be sure to copy exactly as per each photo.

Block A - Here is the first block. The photos below this will show you how.Fig. 1 – To replicate the top block, take one of your tubes and locate the the cream on top and the rust right below. Rip out the seam where my seam ripper is pointing to, open and place just below the above strip.

Fig. 2 – Remember those 24 strips that were not sewn into tubes? Well, take one of those strips and place it in the same order as the top block.


Fig. 3 – Continuing the pattern, pick-up another tube and locate the yellow/darker blue colours and rip out the seam where my seam ripper is indicating.


Fig. 4, 5 and 6 – Follow the same pattern for each strip as shown and rip out the seams where my seam ripper is pointing to.


Once you have finished removing the seams for each strip indicated, sew the strips together (be careful not to mix them up) and press open the seams. When sewing the seams together, I used a lot of pins and it really did make a big difference in my seams matching up.

My favourite pins are made by Dritz. The pins slide easily through all the layers and hold very well.


When pinning the strips together, I placed 2 pins per seam intersection. By doing this, none of my seams had to be re-done. If you are not as fussy as me, do what you are most comfortable doing.


After all your Block A (did you make 3 of them?) have been sewn correctly, mark your blocks A with a piece of paper, etc. so that when it comes time to assemble you will be able to locate the correct block when they are called for. My favourite method, is taking a scrap piece of paper and write the appropriate letter, then clip the paper to the pile of blocks with a clothespin. This way, the blocks stay together in the pile and don’t come loose and get mixed up with other blocks.

The rest of the blocks:
Now that Block A is done, the rest of the blocks to be made are indicated below. All you have to do is locate the correct top and bottom colours on your tube and remove the seam between those colours and place them in the order exactly as per each photo.

Block Aa - make 3


Block B - make 6


Block C - make 3


Block Cc - make 3


Block D - make 6


Next tutorial will show how to assemble the blocks so that the pattern emerges.


For this tutorial, you do have my permission to copy the photos, the tutorial, etc. and share amongst friends ..... please .... just don't use any of this tutorial for $ profit.


Have fun!