


 Fig.1 – draw a 12” x 12” square on a piece of paper (do not draw any seam allowances).
 Fig.2 – shows some lines that have been drawn in and the measurements are shown below in Fig. 3.
 Fig.3 – draw your lines according to the measurements shown.
 Fig.4 – this is the section that we will be working on next.
 Fig.5 – these are the templates for the window section (there will be measurements for a door for those that want a door instead of a window).
 Fig.6 – the measurements below do not include any seam allowances.
 A – ½” wide x 6” high
B and C – 1-1/4” high x 5-1/2” wide
D and E – 1-1/4” wide x 3-1/2 high
F and H – ¾” wide x 3-1/2” high
A – ½” wide x 6” high
B and C – 1-1/4” high x 5-1/2” wide
D and E – 1-1/4” wide x 3-1/2 high
F and H – ¾” wide x 3-1/2” high
G – 1-1/2” wide x 3-1/2” high
Fig.7 – shows the placement for the door
 Fig.8 – the measurements below do not include any seam allowance.
AA – ½” wide x 6” high
BB – 1-3/4” high x 5-1/2” wide
CC and EE – 1-3/4” wide x 4-1/4” high
Fig.8 – the measurements below do not include any seam allowance.
AA – ½” wide x 6” high
BB – 1-3/4” high x 5-1/2” wide
CC and EE – 1-3/4” wide x 4-1/4” high
DD – 2” wide x 4-1/4” high
 Fig.9 – is the start of drawing in the roof section. Again there will be no seam allowances for this section.
From the right hand side, measure in 2-5/8” and make a dot at that measurement. Using your ruler, draw a diagonal line connecting the dot at the top to the bottom on the right on side.
Fig.9 – is the start of drawing in the roof section. Again there will be no seam allowances for this section.
From the right hand side, measure in 2-5/8” and make a dot at that measurement. Using your ruler, draw a diagonal line connecting the dot at the top to the bottom on the right on side.
 Fig.10 – From your 2-5/8” mark, measure 6” to the left and make another dot. Draw a diagonal line as per the drawing.
 Fig.11 – After you have drawn in your diagonal line, make another diagonal line that is ½” wide as shown.
 Fig.12 – Following the diagram, draw another diagonal line to complete the triangle. At the top of the triangle, it should measure 2-3/4” from the left side of your block
 Fig.13 – This is the chimney section. From the point of the triangle at the top, draw a line straight up using your ruler to act as a guide to get a straight line. The width of each chimney will be 1” wide. Follow diagram to draw in your second chimney.
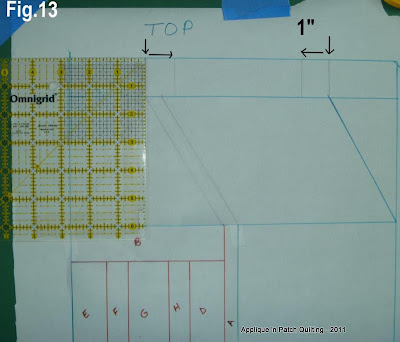 Fig.14 - This is how your block should look.
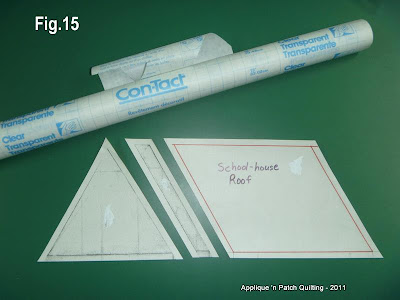
 Fig.15 - I took a couple of photo copies of my roof section, added ¼” seam allowance all around each template and stuck them onto MacTac Contact paper. My templates are hardy and easy to use when cutting out on the fabric.
 Now, for those special blocks that fit into the bottom right side of my houses, I used my EQ software and BlockBase that goes with it.
 Here are a couple of links where you can make 6" x 6" (6-1/2" x 6-1/2" unfinished) blocks:
 Fig.9 – is the start of drawing in the roof section. Again there will be no seam allowances for this section.
From the right hand side, measure in 2-5/8” and make a dot at that measurement. Using your ruler, draw a diagonal line connecting the dot at the top to the bottom on the right on side.
Fig.9 – is the start of drawing in the roof section. Again there will be no seam allowances for this section.
From the right hand side, measure in 2-5/8” and make a dot at that measurement. Using your ruler, draw a diagonal line connecting the dot at the top to the bottom on the right on side.
 Fig.10 – From your 2-5/8” mark, measure 6” to the left and make another dot. Draw a diagonal line as per the drawing.
 Fig.11 – After you have drawn in your diagonal line, make another diagonal line that is ½” wide as shown.
 Fig.12 – Following the diagram, draw another diagonal line to complete the triangle. At the top of the triangle, it should measure 2-3/4” from the left side of your block
 Fig.13 – This is the chimney section. From the point of the triangle at the top, draw a line straight up using your ruler to act as a guide to get a straight line. The width of each chimney will be 1” wide. Follow diagram to draw in your second chimney.
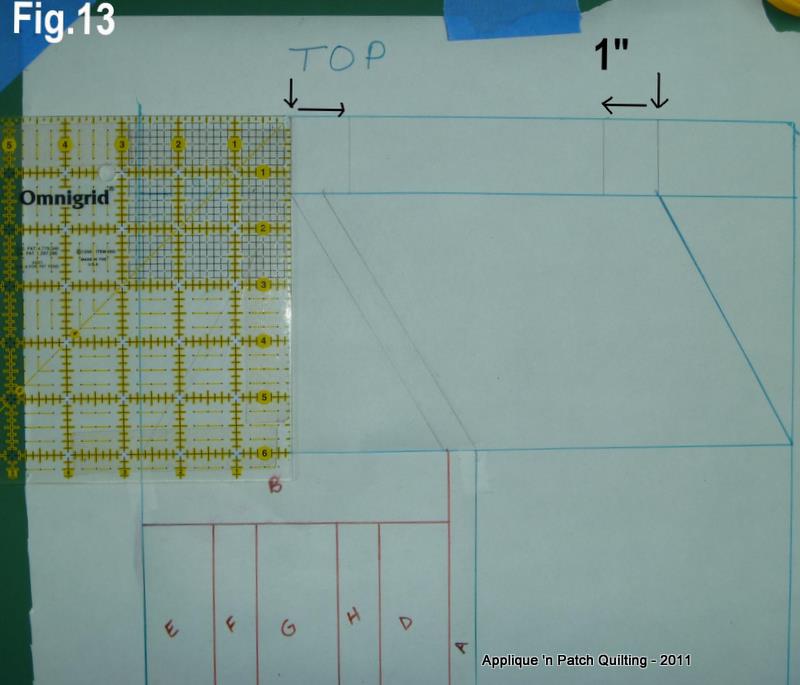 Fig.14 - This is how your block should look.
 Fig.15 - I took a couple of photo copies of my roof section, added ¼” seam allowance all around each template and stuck them onto MacTac Contact paper. My templates are hardy and easy to use when cutting out on the fabric.
 Now, for those special blocks that fit into the bottom right side of my houses, I used my EQ software and BlockBase that goes with it.
 Here are a couple of links where you can make 6" x 6" (6-1/2" x 6-1/2" unfinished) blocks:
Cre8tive Quilter
My next post will show you how to assemble the block.
Have a great day!


