
A - Since my klosjes finish at 6" square, draw a 6-1/2" x 6-1/2" square on a sheet of paper. Draw your 1/4" seam allowance all the way around just so that you can see what your finished size will look like. Draw diagonal lines from corner to corner as shown.
 B - Make a mark 2" from the top and bottom. Using your ruler, (line up the diagonal line on your ruler to the diagonal line on the paper) continue making your line going from one diagonal line to the other diagonal line. Do the same for the bottom.
 C - Again, using the diagonal line on your ruler, line up your ruler and make a 3/4" mark as shown by the arrows.
 D - Repeat the same process for the other half of the square block.
 E - Make a mark 1" in from any side, take your compass and put the point in the very middle (see arrow) and extend the other arm of the compass with the lead pencil part to the mark and draw a circle all around. At this time, you can make any changes to the shape that you want.
F - Your template is made. I traced the template roughly by hand so that you can see what your klosjes will look like.
 G - Cut out your paper templates.
 H - Staple your templates onto scrap pieces of paper. Usually, I cut out 4 pieces of scrap paper at a time (any more paper and your templates will get wonky). The edges of the original templates got a coating of orange marker so that I can see where to cut.
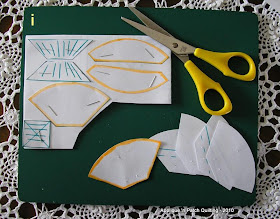
 i - Cut your templates out and remove staples. I keep the original templates and cut out additional templates whenever more are needed using these originals. My templates get used often but at some point, they just get too many holes from basting and eventually they get tossed out.
 You are now ready to start basting away. Just be sure to keep your fabric and templates on the straight of the grain. Have fun!
This is what my klosjes are looking like today. I'm just raiding my stash and auditioning fabrics to make sure that I get a nice colour wash look. I'm making a queen size quilt and need 196 blocks. So, there are lots more to go. At some point, these blocks will have to be transferred to my larger design wall as I need 2 more rows on one side and 5 more rows on the bottom and I just simply ran out of room with this design wall. I can do 3 to 5 klosjes a day, but my fingers are getting a bit sore from the needle, so it is time to slow and work on something different for a few days.
 For those of your who celebrate Easter ..... Happy Easter! Stay safe.
Thanks for the "step by step"!
ReplyDeleteappreciate it!
Thanks for sharing, the klosjes look great! ♥
ReplyDeleteThanks! I think I can do this. ;)
ReplyDelete196 blocks, that is a LOT.
ReplyDeleteYou are very generous to share this wonderful pattern and technique. Thank you.
ReplyDeleteThanks for the detailed step out -
ReplyDeletehave a great weekend -
your design wall looks great
Great job. I like your little test pieces on the wall. Happy Easter!
ReplyDeleteI have printed off your instructions ,thankyou so much ...love Jan xx
ReplyDeleteWhat a great tutorial for drafting. I love to know how to do different blocks, thanks so much.
ReplyDeleteYour wall is looking very inspiring.
Thank you for sharing. Your work is most beautiful, my dear.
ReplyDeleteGreat instructions. I can not wait to try these.
ReplyDeleteLooks like you may run out of room on your design wall!
ReplyDeleteIt is so neat how you lay out possible backgrounds with a scrap in front to audition combinations!
ReplyDelete