Well, my Lover’s Knot pattern sure generated a lot of interest and questions which I will try to answer for you.
The majority of these blocks were made with Repro charm squares with other fabrics from my stash thrown in to add to the overall look. There are some Asian fabrics in there, too.
I have been collecting packs of charm squares for a few years now and always buy two packs of the same line. Why? I don’t know but this is something that I just started to do and it sure paid off with this quilt.
I used EQ6 for this pattern and I chose to have seam allowances on my print out (except for the leaf template which I chose to cut off). My blocks were hand pieced and these instructions are based on that. Sorry, I can’t help you if you want to machine piece your blocks.
So, for those of you who have this pattern or who want to try this pattern, the following is how to make those blocks.
A - Take a photocopy of pattern templates (you will never know when the original will come in handy again) and glue onto a piece of acrylic plastic (using a glue stick, place glue on the printed side of the photocopy). Once glue is dry, cut out your plastic templates. Nexcare tape (thanks
Janet for the tip) on the back of the templates help to stop them moving around once you start to cut out pieces of fabric. Punch holes in the templates to use for pinning templates onto your fabric.
 B
B - Since my blocks measure 5” square (4-1/2” square finished), take two 5” x 5” charm squares (they must be the same fabric) and pin the background template in place with pins and cut around the template. Be sure that each charm square has the straight of grain going in the same direction. It sure helps to keep the square flat and not go all wonky.
 C
C - The remaining portion of the charm squares will give you one leaf and 2 small squares for the corners. For the leaf, trace around the template with a washable marker and when cutting the fabric, be sure to add seam allowance all around.
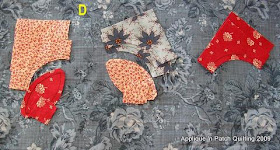
 D
D - Take 2 more charms and repeat the process and so on. Mix up your fabrics so that your blocks don’t end up with a negative and positive version.
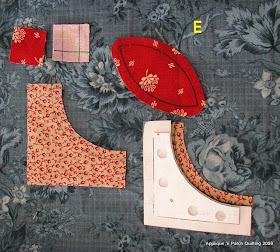
 E
E - Time to mark your fabric pieces with ¼” seam allowance. I used Crayola washable markers.
For the background template B, I made an extra photocopy and cut out the seam allowance in the curve part. I just place that new template on top of the fabric and draw in my seam allowance.
 F
F - Take one of the corner squares and find the straight of grain on both the square and the background fabric, sew the corner square starting at the intersection point of the seam as per the photo. For hand sewing, I do a simple back stitch. For this photo, it turned out that the straight of grain was up/down. It can also be sideways and that would be OK too.
 G
G - Sew on the other background section starting and stopping the stitching line as shown. Don’t worry about straight of grain for this piece.
 H
H - Before cutting my thread, finger press open the seams and place a few tacks to hold the seams open and in place (just don’t stitch through to the front).
 i
i - Prepare the leaf section as per your favourite appliqué method. For me, for this leaf, I chose to fold back my seam allowance and do a running stitch around the piece.
 J
J - This is how your piece should look on the backside.
 K
K - Pin the leaf section onto the background section. Notice how I don’t match up the leaf point right at the intersection of the background and corner square? The reason being is that as you stitch from the bottom point to this point, the leaf section will actually start to shift down and when you come to the intersection, the points will then match up.
 L
L - This is what the finished block should look like. Because of the many markings on the block, I prefer to wash my blocks in batches thus getting rid of any markings before I start to assemble these blocks into larger bocks and iron the seams.

So, have I inspired or scared off any of you into making this block?
I started this project Feb. 2008 and did not work on it all the time. So, it is doable. The small blocks were done by hand piecing and hand appliqué and then machine sewn in sections alternating a light background with a dark background.
Collecting those small charm packs has started me on my way to collecting repro fabrics and I now have a nice tidy stash to work with for future projects. The quilt you see in this photo will be the next one that I will be making with these fabrics; but that will be for another day.

Have a great day!
 Between my Lover's Knot and this pattern, my charm squares have vanished from my stash. What is a girl to do? Well ..... buy some more!
 These came from Fat Quarter Shop and I'm keeping tabs on some new ones that will be coming out this fall. Love those charm squares!!!!


